
Want to know how to upgrade to GA4 from Google Universal Analytics for both Blogger & WordPress? Then this simple step-by-step guide on how to set up GA-4 via Setup Assistant is for you!
If you are still using the old Universal Analytics , then it’s high time to switch to the new Google Analytics 4 as Universal Analytics won’t process new data in standard properties! Many of you know that I have two websites on both the platforms, Blogger & WordPress, hence thought of sharing the latest GA-4 setup guide with you today.
Upgrade to GA4 from Google Universal Analytics for Blogger & WordPress (GA-4 Setup Assistant)
Now, there are two types of bloggers- tech & trend savvy (who immediately joins the trends and experiments a lot) and Lazy Tribe (who are either hesitant to try new things first or just super lazy). I belong to the second category 😛! I could easily setup the new Google Analytics 4 property last year, but no! I took my sweet time and upgraded my sites recently.
ALSO READ: How to be a Freelance Writer?
If you are new to blogging and don’t know how to set up GA-4 for your Blogger/WordPress site without your developer’s help, then no worries. Follow this simple step-by-step tutorial on how to upgrade to GA-4 and thank me later ❤️. Also, do not forget to check out our best and easy tech hacks for 2022!
Enough of my blabbering, let’s do this! Let’s start with the WordPress platform.
How to upgrade To GA 4 from Universal Analytics for WordPress Via GA-4 Setup Assistant?
In this guide, I am going to show you how you can upgrade to the latest Google Analytics 4 for your WordPress site quickly using GA-4 Setup Assistant.
Step1: Open your Universal Analytics property
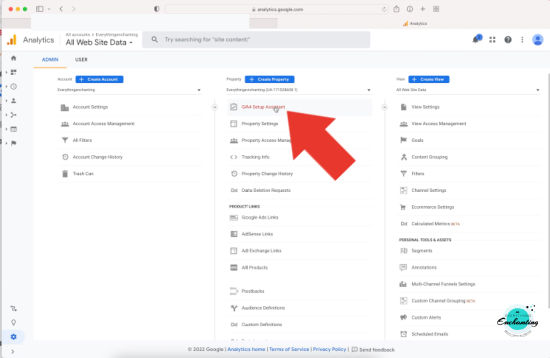
Open your existing Google Universal Analytics account. And go to the ADMIN section of your property, located at LHS of the dashboard.

Step2: Select GA-4 Setup Assistant
Now, click the GA-4 Setup Assistant option. You’ll find it under your website property linked with tracking ID.
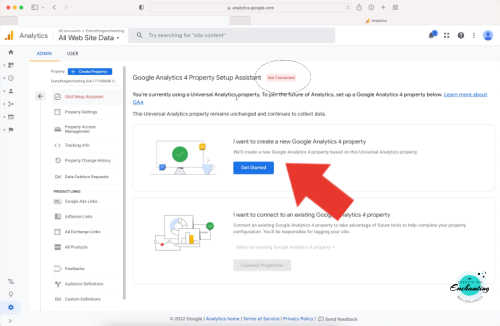
Step 3: Select the first option – Get started
Select the blue highlighted option – I want to create a new Google Analytics 4 property.
ALSO READ: Easy technical hacks you must know for everyday use
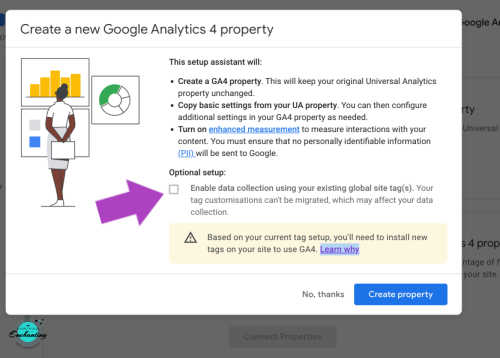
Step 4: Create properties
Next, create properties.
Kindly note, if your existing account is pretty old or your site doesn’t have gtag.js already installed , then you might not get the option to check this ‘Enable data collection using your existing global site tags’ optional setup box. In this case, just click the “create properties” and go to the next step. This happened with my old Blogger account, so don’t fret!

Step 5: Go to your new GA-4 property
Now you’ve successfully connected your properties, so go to the new GA 4 property.

Step 6: Choose DATA STREAM
Once you’re in your new GA 4 Property, click the Data Stream, the fourth option from LHS top.

Step 7: Copy the Global Site Tag script
Click the ‘Add new on-page tag’ and copy the Global Site Tag (gtag.js) code/script.

ALSO READ: Top 10 Free Online Design Creative Tools
Step 8: Paste the code & save everything
Now, go to your WordPress dashboard and find the Header & Footer plugin. In the Header section, paste the new gtag.js code that you’ve copied from the GA-4 account. Save it and tadaa! You’re done!
Kindly note, you can paste the code using theme editor too if you know the process. The codes scare me, hence I prefer using simple plugins for adding third-party scripts. Easy-peasy!

Step 9: Check your new Google Analytics 4 property report
Now, you can visit your new Google Analytics account and check if everything is fine. In your latest GA-4 account, you’ll see two columns instead of three. You’ll also notice a message in your account that says- ‘Your website data collection is active’.
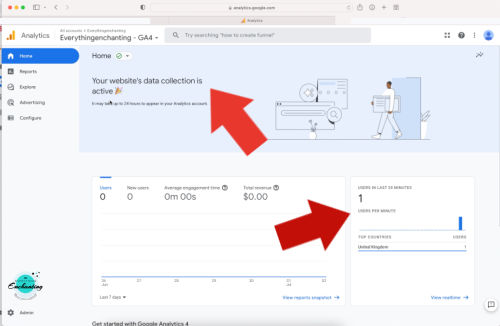
You’ll start seeing the stats almost after 24 hours. However, you can visit your website instantly to check if it’s getting reported under new GA-4 report snapshot (real time).
Now. you know how to upgrade to Google Analytics 4 quickly for WordPress using GA-4 Setup Assistant 😉. For video tutorial, visit here!
ALSO READ: 6 tech hacks you wish you knew before now
How to upgrade Universal Analytics To GA4 for Blogger Via GA-4 Setup Assistant?
In this tutorial, I am going to show you step-by-step how you can upgrade to the latest Google Analytics 4 for your Blogger site easily using GA-4 Setup Assistant and a custom HTML option.
Basically, you need to follow the same steps (step 1 to step 7) as aforementioned for WordPress. However, I’ll still describe each step here to make it easier for you!
Step 1: Open Universal Analytics property of your blog
In your existing Google Universal Analytics account go to the ADMIN section of your property, located at left-hand side bottom of the dashboard.
Step 2: Click the GA-4 Setup Assistant
Now, select the red color coded GA-4 Setup Assistant. You’ll find this option under your website property linked with tracking ID, usually the middle column.
Step 3: Select the first option
Choose ‘I want to create a new Google Analytics 4 property’.
ALSO READ: Top Indian Lifestyle Blog Recognition And 1st Blog Anniversary
Step 4: Create properties
Next, create properties.
Kindly note, if your your site doesn’t have gtag.js already installed (old blog), then you might be unable to check this ‘Enable data collection using your existing global site tags’ optional setup box. In this case, just click the “create properties” and go to the next step. And if this option is enabled, then great for you!
Step 5: Connect your properties
Now you’ve successfully connected your properties, so visit your new GA-4 property.
Step 6: Select Data Stream option
Once you’re in your new GA-4 Property, click the Data Stream, the fourth option above Data Setting.
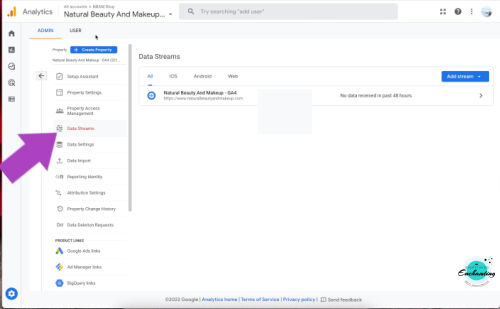
Step 7: Go to ‘Add New On-Page Tag’
Click the new on-page tag and copy your new Global Site tag (gtag.js) code/script.

ALSO READ: The coolest lifestyle gadgets you’ll ever need
Step 8: Go to your Blogger account
Now go to your Blogger dashboard and click the Layout option.

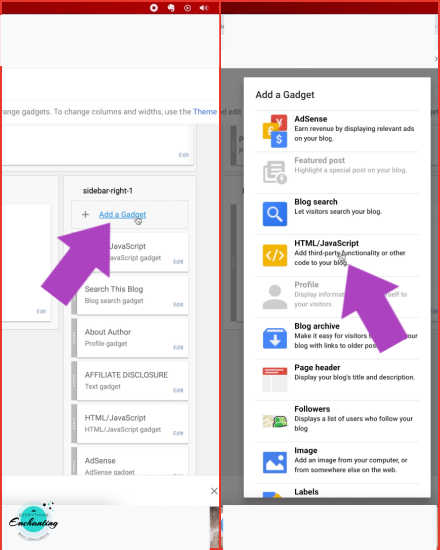
Step 9: Select ‘Add a new gadget’
Click ‘Add a gadget’ and select HTML/Java script option.
Step 10: Paste the code and done!
Now, paste the gtag.js script in the dedicated box and save it. YAY, all done! Now. you know how to upgrade to GA-4 property quickly via GA-4 Setup Assistant for Blogger sites😉.

To verify everything is working smooth, you can visit your website. And then go to your new Google Analytics 4 property and check the real time report. You’ll see the message – ‘Your website data collection is active‘. The report snapshot should show your recent visit to the site! If not, then wait for a few minutes and refresh the page.

The latest GA-4 properties are gathering data everyday. However, I still visit my Universal Analytics accounts to check the daily reports. You can find this option on the top left side under all accounts. After a day or two, you’ll also receive an email from Google that you need to associate your search console account with your new GA-4 property.

Well, if you haven’t yet checked out my first beauty blog ‘Natural Beauty And Makeup“, then do it now! It mainly features content related to natural beauty and lifestyle 🙂.
Note: Kindly excuse the quality of images shared here! I always reduce the image size and publish them in low quality for the sake of page speed. For better clarity, you can check out the video tutorial on my channel.
YOU MAY ALSO ENJOY READING THESE POSTS ⬇️
- Habits That Keep You Awake Late At Night
- What makes Mediterranean food so healthy?
- Top 5 reasons why jewelry is a great investment
- 7 Best Ideas For A Pearl-themed Party
- 6 interior designing tips you must know
- Why you should opt for Biophilic design to beautify your home this year
- 6 Best National Parks in the UK to Visit This Summer
- Park Plaza Victoria London Hotel Review
- What should you take to keep your gut healthy while traveling
- The ultimate hair care guide for summer
- A complete summer skincare guide for oily skin
- La Roche-Posay Thermal Spring Water Review
That’s all fellas! I hope you find this GA4 setup guide/tutorial for Blogger & WordPress, helpful. Let me know if you have any doubts in the comment section below.
Hey! Never Miss A Single Blog Post. How?
#Click This Link
OR
# Scroll Down & Subscribe To Our NEWSLETTER!!


The step-by-step is so helpful! I usually make my husband take care of my website’s tech side.
This is great, thank you sooo much…I need to do the upgrade asap.
Thank you so much for this! I’ve been putting off upgrading because I was afraid I’d blow something up. LOL>
You’re welcome 🙂
I’m the 2nd type sometimes and the 1st type sometimes. I think when it comes to analytics, I’m definitely the 2nd type:)
Haha 😜😬
Thanks for sharing the guide! This is very useful for me. I will try this now.
Most welcome 🙂
This is light a foreign language to me haha but you’ve broken it down step-by-step which is super helpful! Thank you!
You’re welcome 🙂
This is all great to know. I’ll have to look in to this myself. Sounds like something I really need to read on and check out.
Thank you 🙂
As a newer blogger this is golden! It can be so confusing and hard to try and start a blog from scratch.
Thank you 🙂
Great instructions! I had noticed this in my analytics dashboard but didn’t start the process. I think the hardest thing is finding the wordpress header plugin. Thanks for your help.
My pleasure 🙂
That’s a very helpful and informative post. I had no clue about this. I will have to check this out
Thank you 🙂
Awesome tips. I have been putting off setting up. But just got it done!
Thank you 🙂
This is so complete and comprehensive, I also love that there are screen grabs!
Thank you 🙂
Thank you for the tutorial. I just need to grab my new tag and add it to my blog.
You’re welcome 🙂
I som appreciate you sharing and I for sure am checking mine and then using this to upgrade! Very cool and I appreciate you informing me if this 😉
Thank you so much 🙂
This is such a helpful and informative guide. When it comes to setting up different features with my blog, I get a little lost sometimes. I really love how you break everything down!
Thank you 🙂
I like that there is a set up assistant. Those are always helpful.
Yes!
That’s amazing! This is one of the most interesting topics! Thank you for sharing this information with me.
My pleasure 🙂
I use wordpress myself so these tips are so helpful for my to migrate to the new set-up, thanks for the clear explanation
You’re welcome 🙂
Great detailed instructions. Thank you! I need to do this so I’m going to bookmark your post for later.
My pleasure 🙂
These are definitely very precious information and it’s seems so easy with you step by step tutorial.
Thank you 🙂
Thank you for sharing this wonderful information, I’m in the process of upgrading mine. It was very helpful
You’re welcome 🙂❤️